Mocha: Advanced tips to easily test asynchronous fonction

♻ Basic usage

Everyone knows Mocha’s done callack :

it('should work without error', function(done) {
  testedfunction()
    .then(() => done();)
    .catch((err) => done(err); )
  );
});

This is simple, but there’s 2 points to notice here:

    1. I use then(() => done();) and not then(done) : the then(() => {}) form, done is executed with this poiting to Mocha while the other one this is the promise and done may no work.
    2. I use then(…).catch(…) and not then(() => {}, (err)=>{}), here is why:
it('should work without error', function(done) {
  testedFunction()
    .then((result) => {
      assert(result === 'yes'); 
      done(); 
    })
    .catch((err) => done(err); ) 
    // test fails if testedFunction failed or if result != 'yes'
  );
});
it('should work without error', function(done) {
  testedFunction()]
    .then(
      (result) => {
         assert(result === 'yes'); 
         done(); 
       },
       (err) => done(err); ) 
       // test fails if testedFunction failed only. error handler is not called
       // if assert failed
    }
  );
});

♻ Better promise usage:

It is less known that one can return a promise to Mocha:

it('should work without error', function() {
  return testedFunction()
    .then((result) => {
      assert(result === 'yes');
    });
  );
});

♻ Even better: async/await

Since 7.0.0, node support async/await function, and an async function returns a promise “under the hood”, so that we can write tests using aync function:

it('should work without error', async function() {
  const result = await testedFunction();
  assert(result === 'yes');
});

And this is true also for hook functions:

before(async function() {
  await db.connect();
);


I use extensively asyn function in my tests: this make my code easier to write, to read and to maintain: so my advice is: try them !


See you and have a nice code 🙋

Nodejs & Promise : advanced tips – part two – Using Promise ? Yes, but just any one ;-)

This is the second part of my series dedicated to promise. The previous post, about anti-pattern, is here.


♻ The problem

Let’s say you find a module that fit your need. It returns Q promise while your program use Bluebird promise. Oups… . It probably work, but I’m keen on mixing Pormise implementation, and on being forced to use an implementation I don’t want.

A module should not force the use of a specific kind of promise


♻ A first solution:

Some libraries let users to plug in their favorite promise. Here is an example extract from mongoose documentation:

// Use native promises
mongoose.Promise = global.Promise;
assert.equal(query.exec().constructor, global.Promise);

// Use bluebird
mongoose.Promise = require('bluebird');
assert.equal(query.exec().constructor, require('bluebird'));

This works, but having to plug in a promise for each module (each module having it’s own way to define Promise) is cumbersome.


♻ A better solution: Any-promise.

Here is how any-promise introduces itself:

Let your library support any ES 2015 (ES6) compatible Promise and leave the choice to application authors. The application can optionally register its preferred Promise implementation and it will be exported when requiring any-promise from library code.

The code of the module is straightforward: it get a Promise class from any-promise:

const Promise = require('any-promise');
new Promise(function(resolve, reject){...});

The application then as to register the implementation he wants to use before using any-promise or any mobule depending on it:

require('any-promise/register/bluebird')

Note that any-promise won’t accept to register multiple implementations.


♻ Usage

Numerous modules already depends on any-promise. I regularly use mzthenify-all and fs-promise along with Bluebird. You can also have a look to my own module: events-to-any-promise.


This conclue my posts about Promise. I hope you’ll think to it when you’ll write your public module.

See you and have a nice code 🙋

Nodejs & Promise : advanced tips – part one – Anti-pattern

Here is the first part of a two parts-post dedicated to promise. This part is about some anti-patterns that we ofen use when we begin to play with promise. The second part explains how writing code able to use any promise implementation.


♻ Promise hell

While promise are made to avoid callbak hell, it still possible to see such code:

'use strict';

function doSomethingAsync1() { return Promise.resolve(); }
function doSomethingAsync2() { return Promise.resolve(); }
function doSomethingAsync3() { return Promise.resolve(); }
function doSomethingAsync4() { return Promise.resolve(); }

doSomethingAsync1().then((result1)=>{
  return doSomethingAsync2(result1).then((result2) => {
    return doSomethingAsync3(result2).then((result3)=> {
      return doSomethingAsync4(result3).then((result4) => {
        console.log(result4);
      });
    });
  });
}, (err) => {
  console.log(err);
});

Each result variable is accessible from inner code and thus is error prone, while with promise it’s easy to avoid this:

'use strict';

doSomethingAsync1().then((result)=> {
  return doSomethingAsync2(result);
}).then((result) => {
  return doSomethingAsync3(result);
}).then((result) => {
  return doSomethingAsync4(result);
}).then((result) => { 
  console.log(result); 
},(err) => { 
  console.log(err); 
});

With the ‘short arrow notation’ these becomes:

'use strict';

doSomethingAsync1().then(result => 
  doSomethingAsync2(result)
).then(result => {
  doSomethingAsync3(result)
}).then(result => {
  doSomethingAsync4(result)
}).then(result => { 
  console.log(result); 
},(err) => { 
  console.log(err); 
});

♻ Partial error management

Can you say if one of this two codes is better ?

const somethingAsync = Promise.resolve('foo');
somethingAsync.then( 
  (result) => { 
    // Processing result 
   }, (err) => { 
   // error management 
   });
somethingAsync
  .then((result) => {
    // Processing result
  })
  .catch((err) => { 
    // error management 
  });

The first code handle ‘somethingAsync’ errors only. It does nothing if  ‘Processing result’ failed because the error handler passed in ‘then’ covers only the promise returns by aysnc code.

The second code handle both ‘somethingAsync’ and ‘Processing result’ errors, thanks to promise chaining. If proccesing result throws an error, ‘then’ returns a rejected promise and therefore catch is called. Thus the code snippet at the end of the previous chapter is better like this:

doSomethingAsync1()
.then(result => 
  doSomethingAsync2(result)
).then(result => {
  doSomethingAsync3(result)
}).then(result => {
  doSomethingAsync4(result)
}).then(result => { 
  console.log(result); 
}).catch((err) => { 
  console.log(err); 
});

Bluebirdjs’ wiki has another way of explaining this.

♻ Error is not reject

A function can have a synchronous action to do before calling an asynchronous function:

function foo() {
  let result = doSomethingSync();
  return doSomethingAsync(result);
}

Such code has a huge pitfall. Typically one will use it this like:

foo().then(....);

What’s wrong with this ?
If the synchronous code throw an error, nothing can catch it…

A safer approach consist of writing async function so that all errors are delivered through a promise rejection. Here is a better exemple:

  function foo() {
    try {
      let result = doSomethingSync();
      return doSomethingAsync(result);
    } catch (err) {
      return Promise.reject(err);
    }
  }
}

I’m a fan of  bluebirdjs, which offer a mean to easily turn  an error into a rejection:

const Promise = require('bluebird');

function foo() {
  return Promise.try(() => {
    let result = doSomethingSync();
    return doSomethingAsync(result);
  });
}

This concludes this post. If you don’t know bluebirdjs yet I advise you to have look at it, as far as I know it’s the best promise implementation in Node world (let me know if there’s lib that can compet with). My next post about promise will be issued in a couple of weeks.

See you and have a nice code 🙋

My name is JSON, UX JSON: a user friendly format for configuration file

♻ The good, the bad: it’s the same one

I must confess something: I both love and hate JSON 🤒

Using JSON to exchange data suits me just fine. BUT when I manually edit a json file, I’m something like ☹☹☹.  Quotes and comas are painful to be handled manually. And I miss comments.  Hoppefully, thete’s more use friendly format for configuration file.


♻ Humanised config files: the good, the good and the good

YAMLCSON, JSON5 and HJSON offers more user friendly configuration files. To use a buzzword, they offer a better user experience. I personally use HJSON, but it’s a subjective choice: they both do the job, choosing between them is rather a matter of taste.

HJSON is introduced as “A configuration file format for humans. Relaxed syntax, fewer mistakes, more comments.”.  Fewer mistakes: not only using HJSON syntax is less boring but it requires less headace to fix it.

HJSON syntax matches what I’m looking for:

  • Comments are allowed
  • Quotes and commas are no more required
  • Bonus: brackets is no more needed for root object

Here is an example that show all the features of human json:

// for your config
// use #, // or /**/ comments,
// omit quotes for keys
key: 1
// omit quotes for strings
string: contains everything until LF
// omit commas at the end of a line
cool: {
  foo: 1
  bar: 2
}
// allow trailing commas
list: [
  1,
  2,
]
// and use multiline strings
realist:
  '''
  My half empty glass,
  I will fill your empty half.
  Now you are half full.
  '''

If you are interested you can go to the official Web site and find the library of your language (there’s lib for Java, Javascript, Python,  Go,…). I use the javascript one in my node projects without troubles.


♻ What’s missing

I’d like to have supports for date (even if, in javascript, moment can do the job), and, above all, a schema validator. I really find boring to write all validation manually, and even more boring to read a code that validate a config file (hopefully joi module exist).


♻ Conclusion

At this time of writing, I don’t know any config file format that suits me just fine. I choose hjson,  but, again, it’s a subjective choice: do your own research and choose what fees you best.


🙋 See you and have a nice code


Rabbit mongoose, part 2: faster update

My previous post gives tips to get data faster. In this post I give so tips to update data faster than with the simple save method.

♻ The basic save method

Here is the schema I gonna use:

const UserSchema = new mongoose.Schema({
    firstName: String,
    lastName: String
});

Typicall code to update such data using Id is:

userModel.findById('5767d3add9340ba8102e9f4b').then(
    (user) => {
        user.lastName = newName;
        user.save((err, updatedUser) => {
            ...
        });
    }
);

(To keep example simple I don’t show error management)

This code has two optimization flaws:

  • It reads the user prior to the update
  • It use mongoose object

♻ A faster approach

userModel.findByIdAndUpdate(
    '5767d3add9340ba8102e9f4b',
    {'lastName': newName},
    {new: true, upsert: false}
).lean().then((modifiedUser) => {
  ...
});

Here, only one request (no prior reading request) and no mongoose object. This request is longer to write, but way faster to execute. For sure, one may modify something without knowing the id: mongoose offers a bunch of findAndModify functions: I invite you to digg into mongoose API.

♻ Precaution

Mongoose manages a version field names __v. It automatically increments it each time a document is updated. Mongoose uses this to detect concurrent update. When one uses a method coming from mongodb driver and not from mongoose itself the __v is not used. When using non-mongoose methods, I always manage __v in my requests:

userModel.findByIdAndUpdate(
    '5767d3add9340ba8102e9f4b',
    {$set:{'lastName': newName}, $inc:{'__v':1}},
    {new: true, upsert: false}
).lean().then((modifiedUser) => {
  ...
});

That way my code keep a consistent behavior and have no trouble when I use a mix of mongoose and non-mongoose fonction.


This conclude my series about Mongoose. I hope this will help you to write faster code.


See you and have a nice code 🙋

Rabbit mongoose, part one: getting data faster

Mongoose makes developers life easier and is easy to use. But the examples we’ve all seen is not the fastest way of using it. Here is some tips than can help you when dealing with huge amount of data.

♻ Foreword

I’m  a fan of Promises, so I gonna use them in my examples. However the same can be achieved using callback.


♻  Plain javascript object

By default, mongoose returns its own objects and not the javascript objects returned by mongo’s driver. Mongoose objects have useful methods, like save

  • This is handy…when we need those methods
  • Transforming plain javascript object to mongoose magic objects has a performance cost…even when we need not those extra methods.

  The conclusion is obvious: avoid mongoose objects whenever they are not needed.

You probably already know but in case you don’t, lot of models’ methods return query objects. The query objects have the lean option to prevent transformation to mangoose magical objects. Using lean is straightforward:

MyModel.find (…).lean ().then (…);


♻ Get only what we need: fields list

By default, mongoose returns the full documents, with all fields. But what if we need only some fields ? All finds methods provide fields filter. If want name and age fields only I write:

MyModel.find(…,’name age’).then (…)

The above example select only name and age fields. The opposite exists also:

MyModel.find(…, ‘-name -age’).then (…)

This gets all fields but name and age.  Note that you can exclude a field by default when declaring the model: Selection in schema type. This is handy for security: if password or any sensitive informations are stored, unelected them by default ensures that they will be used only when needed, thus reducing risk of disclosure.


♻ Get only what we need: array elements

With projection operator or element match, query results  contains only first element matching the query. This is useful when we need one subdocument stored in an array. Without them, a query returns the full array elements.

Let’s say that we want the name and professional adresses of our contacts, we have to write a query which select the contacts with address type pro and returns expected fields:

ContactsModel.find ({adresses.type: ‘pro’ }, {_id: 1, name:1, addresses. $: 1}).then (…)

address.$ is the mean to get only the selected address (the same can be done using element match) .


💡 Have you notice the way fields are selected in the above example ? Here I use an object and note a string like in the previous chapter.  ‘_id name address. $’ and {_id: 1, name:1, addresses. $: 1} has both the same meaning but the object approach is the only one used by mongo native driver.  When we use the string approach, Mongoose generates the matching objects. The object approach, if verbose, is slightly faster.


This conclue my tips about mongoose optimization. I hope you find them useful. Notice that this post focus only on coding, you can find tips about mongoose configuration in mongoose doc.


  🙋 See you and have a nice code


Effective NodeJS, part two: setImmediate & process.nextTick

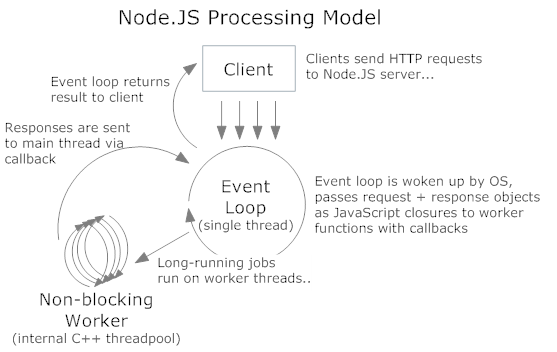
As explain in my previous posts, Event Loop is single threaded. If a code spend too much time in it, event loop becomes a botleneck, callbacks and events processing are delayed. An easy solution is to split the code into “chunks”: event loop thread process a chunk of code, then callbacks, then events, then another chunks then callbacks then events, and so on. For sure, such splitted code complets slower than one-block code, but at least the whole application stay reactive.

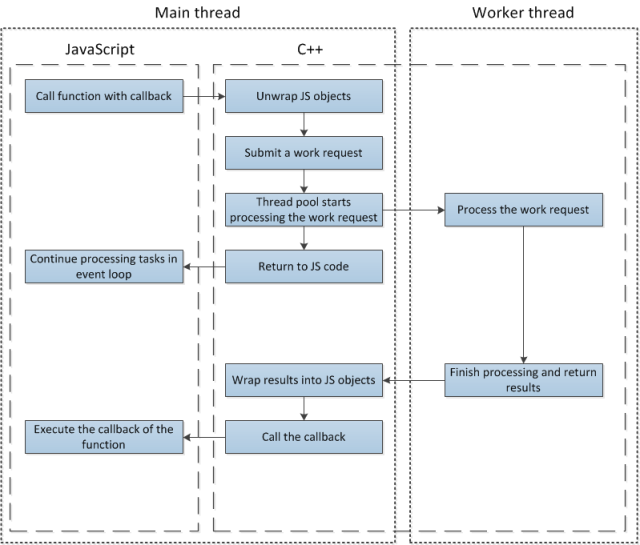
Node provides 2 means that allow code “chunking” setImmediate and process.nextTick. For using them properly one need to understand how they fit in the event loop and how they interact with callbacks and events processing.


First example

setTimeout( () => { 
    console.log('Timer 1');} , 
    0
);

setImmediate( () => { 
    console.log('Immediate 1'); 
});

setImmediate( () => {
    console.log('Immediate 2'); 
});

process.nextTick( () => {
    console.log('Next tick 2');  
});

setTimeout( () => { 
    console.log('Timer 2'); }, 
0);

(Timers are also in event loop, so I added them to obtain a better overview of event loop iteration)

With a Nodejs 4.x, this produces the following output:

Next tick 2
Timer 1
Timer 2
Immediate 1
Immediate 2

😯 Outputs does not follow the code order. And no mater the instructions order would be, the outputs would be the same. This spots the way an event loop iteration behaves :

  • First, ticks and callback are excuteded
  • Then timers are proceeded
  • And finally the events and setImmediate are proceeded.


Do you see in what nextTick and setImmediate differs ?


With nextTick, the code is executed at the begin of the iteration, thus it delays events processing. With setImmediate, the code is executed at the end and so it is delayed by the callbacks and timers but does not delay the events to be processing. Now, up to you to see what is your priority.


Second exemple

'use strict';

setTimeout( () => {
    console.log('Timer 1');
}, 0);

setImmediate( () => {
    console.log('Immediate 1');
    setImmediate( () => { 
        console.log('Immediate from immeditate 1');
    });
    process.nextTick( () => { 
        console.log('Next tick from Immediate 1'); 
    });
    setTimeout( () => { 
        console.log('Timer from Immediate 1');},
     0);
});

process.nextTick( () => {
    console.log('Next tick 1');
});

setImmediate( () => {
    console.log('Immediate 2');
});

process.nextTick( () => {
    console.log('Next tick 2');
});

This produces the outputs:

Next tick 1
Next tick 2
Timer 1
Immediate 1
Immediate 2
Next tick from Immediate 1
Timer from Immediate 1
Immediate from immeditate 1

Here, no suprise: the first event loop iteration executes ticks, timers and setImmediate, then the second iteration executes the ticks, timers and setImmediate added in the first setImmediate. But when one do the same with nextTick, there’s a surprise…


Third example

'use strict';

setTimeout( () => {
    console.log('Timer 1');
}, 0);

setImmediate( () => {
    console.log('Immediate 1');
});

process.nextTick( () => {
    console.log('Next tick 1');
    process.nextTick( () => { 
        console.log('Next tick from next tick 1');
    });
    setImmediate( () => { 
        console.log('Immediate from next tick 1');
    });
    setTimeout( () => {
       console.log('Timer from next tick 1');},
    0);
});

setImmediate( () => {
    console.log('Immediate 2');
});

process.nextTick( () => {
    console.log('Next tick 2');
});

This leads to the output:

Next tick 1
Next tick 2
Next tick from next tick 1
Timer 1
Timer from next tick 1
Immediate 1
Immediate 2
Immediate from next tick 1

Ticks, timers and setImmediate added in the nextTick are executed in the same iteration, thus the tick “tick from next tick 1” execution delay setImmediate and events processing. And if it would call some other nexTick, those last would also been processing in the event loop and would also delay event processing, and so on…


Conclusion

One can “chunks” his code using setImmediate or nextTick depending on its priority (chunked code to be executed before or after events). But when it comes to recursivity (chunked code using setImmediate/nextTick to execute code which also call setImmediate/nexTick), one should avoid nextTick, because this would postponed events processing and would prevent NodeJS to behave reactively.


This conclude my series about NodeJS overview. My next post will be about how to use mongoose in an optimized way.


See you and have a nice code 🙋

Effective NodeJS, part one

NodeJS, What for ?

nodejs-green


Node is not suited for CPU eavy applications, but it is OK for Rest server, chat server or web gammig: Node is made for processing lightweight requests.


One should consider Node for serving requests issued by single page applications written with Angular or Backbone. This is the case where Node is the best. But you can also use Node to generate HTLM using tools like Handlebar, and Sails lets you create application with MVC architecture. To be complete, streams allow fast processing of huge amount of data making Node a tool of choice for ETL.


♻ Effective application architecture

At this time of writing (February 2016), clustering a single Node app is the buzzword.  It consists of forking the Node process, HTTP connections are then spread around the children processes. To find out how this can be done, I invite you to read this post.


♻ Code : lesson I’ve learned

At my beginning with Node, I wanted a mean to hash passwords with a salt to store them in a database.  For this I first used a library found on npms.org. It was working well and quickly…. when processing one request at a time.
When I tried multiple requests, response times were terrible 😨.
What was going wrong ❓❓❓
The library I was using was doing all its computation in the event loop, thus preventing Node to process multiple requests in parallel 💡( you can find an introduction on event loop in my previous blog).

Knowing that, I removed the lib and wrote a hashing and salting function using Node’s Crypto module.

  • It’s more work
  • Response time for completing single request was a little bit longer than with the previous lib.
  • … Response time while processing multiples requests was actually better

The reason ? I was using asynchronous functions, which allow to spend less time in event loop, thus lets Node to process requests in parallel (to simplify, event loop was able to treat a request while a worker thread was computing the hash). This lead us to the golden rule when developing a Node app:

As far as possible, don’t overload the event loop

This can be achieved using some rules:

  • Always prefer asynchronous functions to synchronous ones. (I’m not always following this rule, but only when I write application initialization)
  • When comparing modules, prefer  those using asynchronous Node’s API or having their own C++ module
  • If you use to develop javascript on browser side, sorry but forget your favorite libraries. No matter how rapid they are, they are not design to fit event loop.


Lastly, if you have a code that keeps event loop busy for a while, you probably  haven’t good reactivity. There’s 3 ways to address this:

  1. Create a specific application that can be launched from the event loop. Here is NodeJS documentation for managing child process..
  2. If you’re courageous enough, you can create your own Node Addon.
  3. You can split your code in chunks using setImmediate or process.nextTick


I’ve not used child nor wrote addon yet, so I won’t break them down: my next post will be about what I know: it will dig into event loop and will explain how to use setImmediat and process.nextTick.


See you and have a nice code 🙋


NodeJS, Single-threaded? Not Single-threaded

I still heard workmate saying that NodeJs is mono-thread. Well, it’s not quite true…but not quite wrong either.

img-211161171f3


Node’s heart is its javascript engine, which is mono-threaded. But other parts of node are in C++ and run in a thread pool.

Let’s imagine a basic Rest API code which receives a request, gets data from a database and returns those data in json. The exchange with the DB is excuted by a thread of the pool so that the javascript thread is able to process another request in parallel.

The thread is often named as the loop event thread and it’s genuine role is to process events. A schema, that can be find in multiple places on Internet, offers a good overview of threads interaction:

nodejs20for20dotnet

Have you notice the use of callbacks ? Whenever event loop calls an asynchronous function has the result, it calls the callback with the result. Behind an asynchronous function, you can find a C++ pool thread code.

Here is another Internet schema to clarify this:

threads-in-node-ja_

Node manages all the plumbing between javascript and C++: all this is unseen by the developer. Yet, Node developer must have this in mind to write effective code. My next posts will explain why and how to write scalable code.

See you and have a nice code. 🙋